You already have a blog on WordPress.com, may be you are using the free plan on the WordPress. So, you have earned the basic idea of this Platform. We have already discussed the difference between WordPress.com and WordPress.org (self-hosted WordPress) in our earlier post.
Now you want to migrate your WordPress blog from platform hosted to self-hosted or in general, you are moving your blog from WordPress.com to WordPress.org.
We are providing an info-graph to recall the difference between WordPress.com and WordPress.org quickly and briefly.
 As you can see the difference between the two platforms above. You can easily decide which one you should go for. You may stick with your current WordPresss.com platform, due to your requirements. But a self-hosted WordPress.org is the #1 Best Blogging Platform (#2 WordPress.com & #3 Blogspot blog or Blogger.com).
Contents
Why should you move?
Themes
One of the major reason for which you can transfer from WordPress.com to WordPress.com is due to the availability of more themes in WordPress.org.
You have the themes for WordPress.com but they are a few for the free subscribers. For the premium subscribers, they will get more professional themes. But for that, they have to pay $99 per annum for the premium subscription.
But when you have the blog on self-hosted WordPress you will get hundreds of free themes as per your niche. Then you can edit the code. You don’t have to pay any additional charges except for the domain and hosting.
We have listed the Top 20 themes for your WordPress.org according to us, you can check it.
Plugins
There are some plugins that are pre-installed on your WordPress.com blog. Those plugins are inbuilt in the WordPress.com. If you want to install more plugins then you have to subscribe for the premium plan. You cannot install any third party plugins.
You will get thousand of free plugins and you don’t have to pay any extra charges. In your self-hosted WordPress blog you will get thousands of plugins, but you responsible for all the installation of the plugins. So it may create any vulnerability in your site. So, choose the plugins wisely. Plugins are just lines of codes (you can install) which can turn your simple WordPress website into a powerful blog or online store with lots of functionalities.
Control over Blog
The main reason you should transfer your blog from WordPress.com to WordPress.org is the control over your blog. In the case of WordPress.com blog, you don’t have the full control over your blog. WordPress will gain the control. It can use your post for their advertisement and profit. In fact, you cannot monetize your blog in this platform.
In the case of WordPress.org platform, you are the only one who is responsible for the development, control, and profit of the blog.
You can monetize your blog or with Google Adsense. The only thing you have take care is the security and backup of your site.
In case you want to move your Blog, then follow the post you will get the step by step guide to migrate your blog from WordPress.com to WordPress.org.
What you required in this process?
Before giving you the tutorial, I would like to mention the things you must have for the migration of your blog. The following is the list of things you should have to migrate your Blog.
WordPress.com Blog
If you don’t have any blog yet, and you want to make a blog on WordPress.com, then you can check our post on that by clicking here. It’s very easy to make a blog on WordPress.com and run it. May be in some case you have to upgrade your blog, which requires extra bucks, which most of you don’t want to pay.
I am giving you an overview of making a Blog on WordPress.com below.
- Go to WordPress.com
- Choose a Theme
- Choose domain name
- Select hosting plan
- Sign up in WordPress
- Customize your blog
- Create your first post
- Set up Gravatar
- You’re Done!
Create a Self-Hosted Blog using WordPress.org
This is the major step you have to make. Previously your blog was hosted by WordPress.com itself. Now, when you choose the WordPresss.org, you are hosting the blog on the space you have purchased for the Web hosting.
If you want to know more about domain and hosting, read this – What is Domain Name and Web Hosting?
You can check our post on how to create a Blog on WordPress.org, there is a step by step guide on that. Here I am giving an overview or you can say the summary of the tutorial.
- Get hosting and domain name
- Install WordPress.org on your hosting.
- Set up your blog
- Start blogging!
You can check our post on Best Hosting for WordPress – How to Choose the Best WordPress Hosting?
Some Plugins
You need to install this plugin in your new WordPress.org site. The name of the plugin is –
WordPress Importer – It is the main Plugin upload the Downloaded XML files in your self-hosted WordPress.
Import Blogroll With Categories – Uploading and Updating the Blogroll in your self-hosted WordPress
JetPack – Maintain the subscribers on your blog you need this Plugin
Import External Images – Upload the remaining images in your WordPress site. (may be not all the images can be uploaded)
Steps for Migration of your site
- Importing your Data from WordPress.com site.
- Exporting the Data to your WordPress.org site.
- Transferring the Subscribers and Other stuff.
- Your site is Ready now.
Importing your Data from WordPress.com site
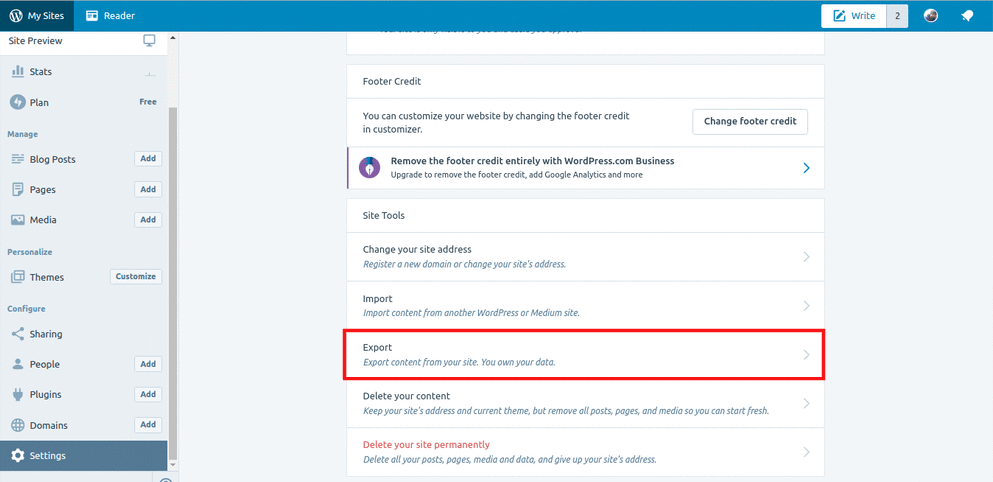
- Go to your WordPress.com blog and click on My Sites, which will appear on the left-up corner of your web page and select Settings. Your website Settings page will open. Scroll down and search for the Site Tools section. There you will find the Export Option. Click on it.

- A window will open. Now you have to click on Export All button. Then your all data will be downloaded on your PC, in an XML file format. Be patient it may take some time.

- You have completed the first phase now.
Exporting your Data to your Self-Hosted WordPress.org site.
As I have mentioned above, you need to install this XML data to create self-hosted WordPress blog or site. After creating the site follow the instruction given below.
- Login to your WordPress.org dashboard.
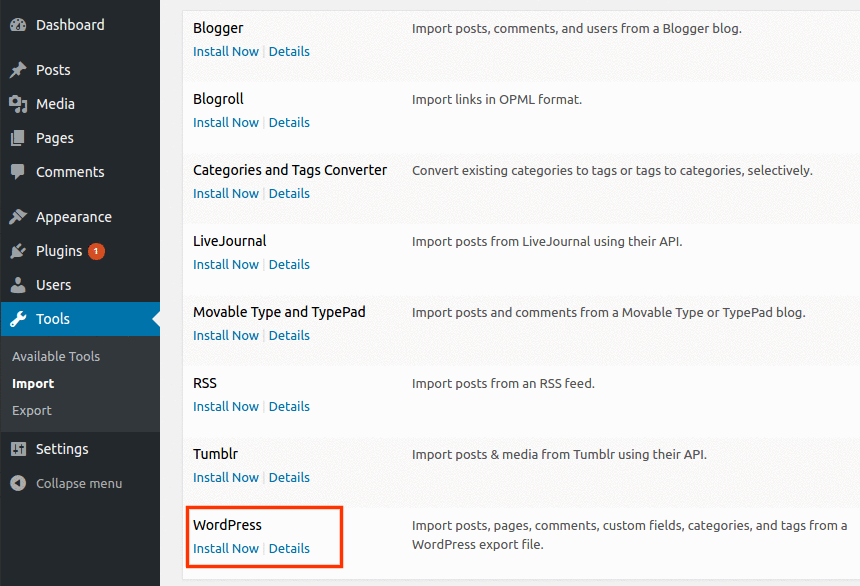
- Now you need to click on the Import option which is in the Tools section
- You will see the platforms from where you can migrate your data to your WordPress.org site.
Go to the WordPress section and click on Install Now.

- After the installation is done, the Run Importer option will appear. Click on it.
- It will ask you upload the XML file, which you have downloaded from the WordPress.com site.
Choose the file from where you have saved it and after that click on Upload File and Import icon.

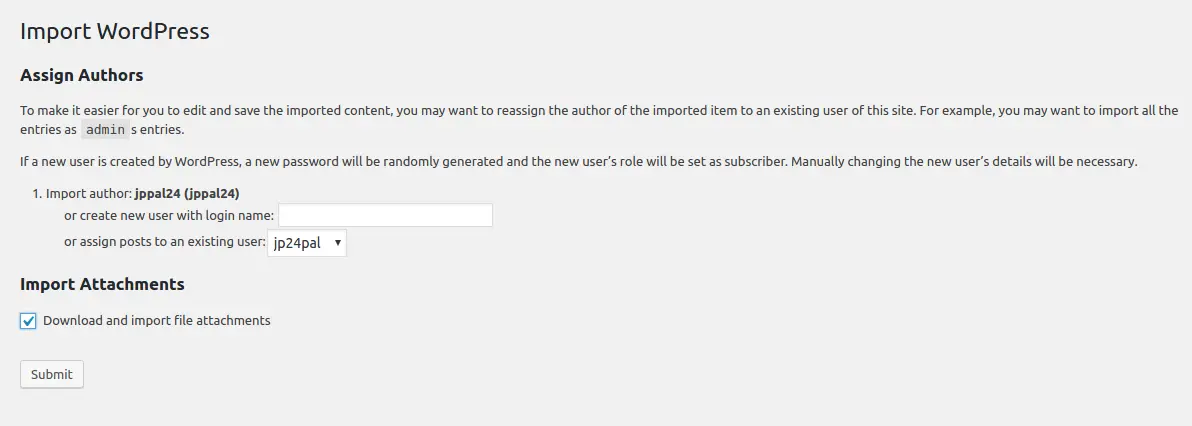
- A window will appear, which will ask you to set the user preferences. You can assign the user as per your choice.
Check the Download and Import all attachments option. Click on Submit

- You have completed the 2nd Phase also.
Transferring the Subscribers and Other Stuff
For transferring the subscribers from you need to install a plugin named as JetPack.
In your WordPress.com site you already have this plugin installed. For handling the subscribers you need to sign-up for the JetPack. After installing the JetPack plugin in your self-hosted site, you need to sign-in with the email address which you have used it in sign-up in your WordPress.com site Jetpack.
Here is a step by step guide for transferring subscribers – guide for transferring subscribers
Importing all the images
Sometimes you may find that the all the images cannot be transferred, so here you can use a plugin to resolve the problem. The plugin is Import External Images.
Install this plugin and Activate it. After activating the plugin you will see a new option will appear in the media option, Import Attachments. Click on Import Attachments.
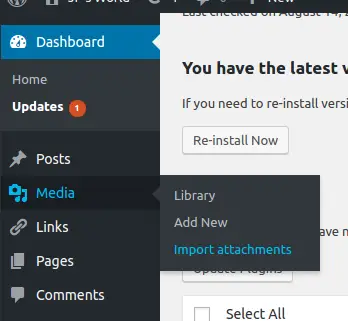
Select the All Attachments option and click on Import button. (Note: If all the images are uploaded then Import button will not show.) Now you have imported all the images.
If you have too many images, then uploading images may take some time. Still, it is not necessary that all your images will be uploaded.
Importance of Blogroll and Update it in your New Site
In the WordPress site, you can add the external links, which are all linking to other websites. In that sense, you are acknowledging those websites. When you add any external link in your blog post then the external site and your site get linked in a way.All the sites which are linking to your site are also listed here. These external links are maintained by Blogroll, it has a file format of OPML
You were using the WordPress Links Manager to maintain the links. Here is a way by which you can still maintain the blogrolls in your new self-hosted site. For that, you have to import the blogroll to your WordPress.org site. Follow the steps.
- Open your web-browser and type: your-site-name.wordpress.com/wp-links-opml.php. Press ENTER
- A page will open in your browser. (Note: If you are not using an external links or Links Manager in your WordPress.com then nothing will open.)
- Save the page in your PC: CRTL + S.
- Download the plugin Import Blogroll With Categories and Activate it in your wordpress.org site
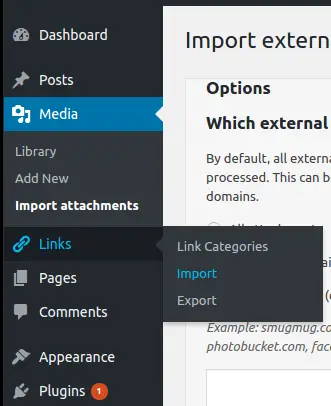
- After installation, a new option will appear in the left panel of your Dashboard. The option is Links.
- Go to Links option and click on Import.

- Now upload the OPML file here.
- You have updated your Blogroll.
Make a redirect page on your WordPress.com
Make a pre-advertisement or announcement in your blog post that you have changed the website and share your new website URL. If you have a custom domain then you don’t have to follow this step. You can update the nameservers if you have a custom domain.
Suppose your visitor still don’t know your new WordPress.org site. You want the visiors to redirect them to your new self-hosted website. Then you can use the WordPress Site Direct feature.
WordPress.com offers you a Site Direct option so that you don’t the traffic and maintain your SEO. To set the Site Direct feature in your WordPress.com you have to pay $13 per year.
Visit this URL -https://wordpress.com/domains/add/site-redirect/your-wordpress-site.wordpress.com

Add the new self-hosted WordPress site domain in the box. This will also help you to maintain the backlinks.
Conclusion
By now all your posts, images and links have been updated in your new WordPress site. If you are new to this WordPress.org platform, then you may have some difficulty in managing the site. The main section is to manage the data and the back end part. But don’t worry plugins are there for your help.
If you want to know which tools and resources we are using you can link on this link – Best Blogging Tools & Resources.
With this the tutorial ends, I hope now you won’t have difficulty in transferring your blog from WordPress.com to WordPress.org. If you have any doubts regarding this article, do let us know in the comment section below. And if this guide really helped you don’t forget to share this article on social media and subscribe to our newsletter to get regular updates of Squarenoid directly into your Email inbox. Keep visiting 🙂
